Search This Blog

Friday, January 28, 2011

Smoking Meats - Hot and Cold

Big smoking day today.  I have about 40 lbs of pork to smoke; about half of it hot smoked (2   shanks, 4 cappocolo, some spare ribs and a few chops) and half cold smoked (6 slabs of belly and 2  jowls for bacon, and another few chops) 
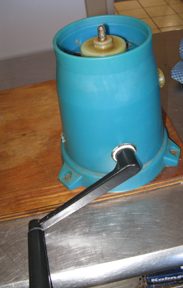
My hot/cold smoker set-up is a combo hybrid.  The hot box is fairly stock propane unit, off-the-shelf with the exception of the converted smoke stack.  The cold box is home-built from a 35-gallon galvanized trash can, some stove pipe parts (chimney), and some shelf brackets plus a length of dryer hose and a battery-operated fan from Radio Shack to pull the smoke from the hot box. The fan runs for a couple of days on 8 AA batteries.  It is switched(side of the battery box) but I've never cold smoked without it running so I probably could have skipped that additional feature.
I'll be smoking with hickory today so I get the chips soaking in the chip box.
I'll also be doing a moist smoke so I get my pan of water on to heat.  No sense in putting cold water in the smoker and having it take that much longer to get up to temperature.  I also season my water bath heavily with garlic, onions, hot peppers and a glug of cider vinegar. I'm not sure if it really imparts any flavor to the meat but it sure makes it smell great while cooking!
I drain the chips after about 15 minutes and put them and the water pan in the smoker, fire it up and crank the heat to "high" to pre-heat while I get the meat ready.
Yesterday I pulled all the meats from their respective brines/smears and set them on sheet pans in the fridge to air-dry for about 24 hours.  Additionally, I tied all the cappos roast-style to help them hold a nice tight shape while smoking and really packed the outsides with my spicy cappo seasoning (See this post for details)  That just left setting the pieces up for hanging today.  I poked holes in a corner of each belly piece, using a butcher's steel, threaded some heavy cotton twine through and knotted a small loop.  I usually use paper clips for my hooks, simply hooking them through the twine and then hanging them on the smoker racks.
   

Time to load the hot smoker.  I put the shanks, ribs, and some of the chops on racks in the hot box, then hang the cappos below them and close up the box.  You want to keep open-door time to a minimum on the hot box - you don't want to vent any more smoke out then absolutely necessary plus even, constant, low temperature is the key to great results. I've read that you have to plan on adding a hour to your smoking time for every time you open the door.  This sounds a little extreme to me but it does emphasize the point well. I'll be shooting to keep the temperature in the hot box just under 200 degrees F today.
With the hot box going well it's time to fill the cold smoker.  I hung the belly pieces on a rack at the highest position, then fill the rack  with the chops and jowls, flip on the fan to start the smoke flowing from the hot smoker and snap on the lid.  It's going to be a little warmer outside today than Ideal for cold smoking (supposed to be in the low 50's) so I opened the damper in the chimney of the cold box to help keep heat from building up.  I've got temperature probes in place so I can track things throughout the day and I'm going to try to keep the temperature below 100 degrees F in the cold smoker.
  
After 30 minutes I adjust the heat down a little in the hot box.  Once they equalize, both boxes are sitting right at their design temperatures and they stay there the rest of the day without further adjustment. 
6 hours later, the meat is done!  The internal temperature of the biggest pieces are above 160 degrees F in the hot box and all of the pieces in the cold box look and smell perfect.  It's time to unload the smokers.
I put all the pieces on lined sheet pans and pop them in the cooler right away to start chilling overnight.  The next thing for most of them will be slicing packaging, and freezing. Oh yeah - and eating!
Cold smoked bellies (bacon)
Hot smoked chop
Cappo
Shank
Spare ribs


Tuesday, January 25, 2011

Personal Cheese Update - 4 more cheeses


Four more of the "personal cheeses"  that I made starting back  in December are ready for testing!.  A Gouda, a Havarti, A Monterey Jack and a Pepper Jack.
Not being one who is overly patient in such things, I slated all four for today's lunch and put together a simple cheese plate meal with some fresh bread.
All of these cheeses were made from our own goats' milk, of course, which makes them each come out a little differently from the same cheeses when made with cows' milk.  That said, they were all very good and quite different from each other, if not perfect representations of their types.
Monterey Jack
Actually, the Jack and Pepper Jack cheeses were both exactly what I had been aiming to make.  The Gouda was sweet, fresh and tasty but the texture was a little too open and it seemed a little immature.  This, it turns out, was my fault as I had misread it's "due date" and had opened it several weeks early.  D'oh! The Havarti was excellent but was, for some reason, missing the many tiny gas holes in the pate that is typical for the cheese.
We are looking forward to enjoying theses cheeses a lot in the near future both on their own and to cook with.

Monday, January 24, 2011

Making Butter


Yesterday I mechanically separated cream from 10 gallons of our goats' milk and got 6 quarts of heavy cream.  Today I'll be churning that cream into butter.
I have a butter churning attachment for my cream separator but have found that it takes a very long time to get it to churn.  It is also very tiring as my machine is hand-cranked and the turning becomes quite difficult as the cream "gathers" into butter.
There are any number of methods for churning butter.  You can make whipped cream in a mixer and over-whip it until it turns.  The same thing can be done in a blender.  Small batches can be done with a quart jar and a few small marbles, hand-shaken to churn.  With so much cream to churn I turned this time to my  14-cp Cuisinart.
The process was fast and simple.  Again, as for separating the cream, temperature is the key.  I brought my cream to cool room temperature (about 55 degrees F) and processed it in batches until it separated nicely.  You don't want to over-process it or you risk heating the fat too much, making the cleaning process more difficult.
 
 
 As the batches got churned I moved the gathered butter into a colander to drain.  The liquid that comes out of the butter is buttermilk and is excellent for use in many cooking and baking applications.
One thing about making butter from goats milk you will notice right away is the color.  It is pure white.  The reason for this is the same as the reason that natural goats milk cheeses are also very white.  The creamy or light yellow color you see in natural cow's milk cheeses and butter come from carotene (a group of several related hydrocarbon substances).  Goats almost fully metabolize nearly all the carotene they ingest while cows pass some of it through into their milk, causing a slight coloration.  Today most commercial butter and many cheeses are additionally colored with annatto, a yellow/orange plant-based food color.
Once all the batches are churned, The butter needs to be worked and washed.  Most instructions for making butter call for it to be worked with a set of paddles.  I find that working with my hands is just as effective.  The only down-side is that you will be working the butter in ice water so it's mighty cold!
The purpose of washing and working it to completely remove any residual buttermilk from the butter.  The buttermilk will go sour and even small pockets of it remaining in the butter will contribute quickly to "off" flavors and eventual premature rancidity.
Once well-washed I lightly salt my butter with fine sea salt.  I used about 3/4% salt by weight in this optional step.   Salting brings out the full flavor of the butter for when it is used on toast, etc. and also acts as a minor preservative.  Unsalted butter is also known as "sweet butter".  Many baking and pastry recipes will call for unsalted butter.
My final yield today from the 6 quarts of cream was 5 1/2 lbs of butter. 
We packed the butter into 8-oz containers, labeled and froze them.  They will be as good as fresh for several months but should be used within a year.


Another type of butter, "cultured butter" is made the same way but the cream will have had a lactic bacteria added to ripen it prior to churning.  This results in a more complex flavor to the butter.

People often  ask us why we don't make goats milk butter commercially.  Our off-the-cuff answer is  "You couldn't afford it".  Flippant perhaps, but true.  We value our milk at $20 per gallon. We reach this figure by calculating the average cheese yield  we get out of a gallon of milk and multiply that by our average sales price for that amount of cheese.  Using today's butter yield (5 1/2 lbs from 10 gallons of milk), if we made the butter to sell we'd have to get $36 a pound for the butter or we'd lose money having not made it into cheese.  Also, as I mentioned in the previous post, the cream  yield I got yesterday from this rich  winter milk was exceptional, more than twice my normal summer yield.  Using the much more abundant summer milk as a basis we'd have to charge nearly $80 a pound to justify not making cheese with that milk!

Sunday, January 23, 2011

Cream from Milk - Mechanical Separation


Today I need to separate the cream out of about 10 gallons of goats milk in anticipation of churning some goat butter tomorrow.
Goats milk is quite different in composition and construction than cow’s milk.  Take the cream, for example.  With unprocessed (specifically, not homogenized) cow’s milk, the cream will readily rise to the surface if left alone for a few hours or overnight.  Not so with goats milk.
Goats milk is said to be "naturally homogenized" because the butter fat molecules in goats milk are so much smaller  by comparison to those in cow’s milk, that they more easily stay suspended in the liquid. (This coincidentally , is one of the reasons that goats milk is considered to be much easier to digest than cow’s milk).
In order to get the cream out of goats milk - either to obtain the cream for other use or to make a lower fat milk product - it must be mechanically separated.  Typically, the way this is done is with an apparatus called a "cream separator" (imagine that!).
Cream separators come in many sizes/capacities and can be successfully made from a number of different materials but nearly all work on the same operating principle: centrifugal force*.  Even though the butter fat molecules are small and in suspension they are still lighter than water (the primary component of milk) and so the act of accelerated spinning works to separate the fat from the milk. From that point all that is left to do is send the butterfat-rich milk (cream) in one direction and the butterfat-poor milk (skim milk) another.
Cream separators have lots of parts that have to go together in just the correct order for it to work properly.  Mine, an old Russian-made, hand crank model with predominantly plastic parts, has over 20 milk-contact parts, plus the crank/transmission unit. 
Here are several pictures of the parts, the sub-assemblies, and final assembly...


To get the best results from a cream separator the most important thing (aside from the correct assembly of all the parts) is to have the milk at the proper temperature.  I have found that 101-103 degrees F (which happens to be a normal goat's body temperature) works best for goats milk.  Too hot and it seems not to get all the cream out of the milk.  Too cool and it gums up the separator plates, clogging up the works.  My unit has a set-screw adjustment that is supposed to let you make heavy, medium, or light cream but it does not seem to have any effect when I have tried it.
The actual separating is easy.  Once the milk is to temperature it is poured into the hopper.  The crank is turned at about 60 rpm (one revolution per second). The flag valve is opened and a stream of milk flows to the bottom of the assembly of plates which, because of the gearing, are now spinning quite fast.  The milk flows through the plates which have a series of holes that direct the heavier elements one way and the lighter another.  The two streams of separated milk find their way to the 2 spouts with a pretty good flow of skim milk going one way and a smaller drizzle of cream the other.


My hopper takes about a gallon of milk so it had to be refilled several times. DO NOT stop turning the crank when there is milk flowing through the machine or it will make a huge mess by flowing out everywhere except from where it is supposed to!
I normally expect to get about a quart of cream from 4 gallons of milk but I had never separated cream at this time of year.  We know from both the milk quality testing we do and the cheese yields we get, that our milk gets much richer in the fall and winter than it is in the summer. We have individual goats who we know can produce milk with about 10% butterfat late in the year (by comparison, regular whole milk at the store is about 3.5% butterfat), but I was still surprised by my yield. 
Today I got 6 quarts of very heavy cream from the 10 gallons of milk!
Tomorrow I will be churning all that cream into Goats Milk Butter.
*Strictly speaking there is no such thing as "centrifugal force". The force we commonly refer to as centrifugal is actually the inverse or absence of "centripetal force".  Confused? Look it up.  Here's a place to start... http://en.wikipedia.org/wiki/Centrifugal_force

Saturday, January 22, 2011

BMR Capocola


This recipe will cure 10 lbs of meat

Ingredients
1    Gallon  Water
350  Grams  Kosher or Sea Salt
300  Grams  Brown Sugar
42   Grams  Cure #1
20   Grams  Granulated Garlic
20   Grams  Ground White Pepper
10   Grams  Ground Coriander

Method
1.      Combine all the brine ingredients and stir until dissolved completely.
2.      Inject meat with 10-15% brine by weight them submerge it in the brine. Weigh it down to keep it fully covered in brine
3.      For a single large piece, refrigerate in brine for 1/2 day per lb.  For multiple pieces use 1/2 day per pound for the heaviest piece.
4.      Remove from brine and tie with butcher's twine every 1" to 2".
5.      Pat dry, and rub well with Capocola Spice mix. 
6.      Put uncovered on rack in fridge to drain and chill for 12-24 hours.
7.      Hot smoke @ 195-200F to an internal temp of 150F, about 4 hours.
8.      Cool to room temperature before refrigerating thoroughly.

BMR Bacon - Cold Smoked Honey Maple


This recipe will cure 10 lbs of meat

Ingredients
1 Cp  Salt
4 Tablespoons  #1 Cure Salt (pink Salt)
1 Cp  Brown Sugar
1 Cp  Maple Syrup (not maple flavored pancake syrup!)
1 Cp  Honey (I use Mesquite honey)

Method
1.      Mix all of the dry ingredients in a bowl and combine evenly.
2.      Add the honey and  maple syrup whisk together.
3.      Rub the mixture all over the slab of pork belly and place in a ziplock bag that is slightly larger than the slab. Place the bag in the fridge and rotate once every other day. The meat will release a fair amount of liquid which will help in the curing process. When you flip make sure to keep the liquid in contact with the pork when you place it back in the fridge. Leave the belly to cure for 7 days.
4.      After 7 days take the pork belly out and rinse all of the cure from the meat. Pat dry with paper towels and place on a drying rack over a sheet pan. Place back in the fridge 12-24 hours uncovered. This will dry out the meat and cause the fat to have a springy almost spongy texture with the meat being firm and dry to the touch.
5.      Cold smoke the pork at around 128°f for 6 to 12 hours, depending on desired end result.
6.      Chill well/par-freeze before slicing.

Curing and Smoking Meats: Brines and Smears


One of the most fun and interesting things I get to do during this winter break at the Dairy is to get caught up on some of the meat processing and charcuterie work I had to postpone.  We were  way too busy when we harvested the pigs and steer last fall for me to get much more done with them than cut up the steaks, and chops, make some stock, render some lard and get the rest frozen in bulk.  Now that I have a reduced work load for a few weeks I will finally be grinding the hamburger, making sausages, smoking hams, and pork bellies for bacon.
Earlier this week I pulled all the bellies, jowls, capos (top necks), shanks and a few pork chops from the freezer and set them to thaw gently in the refrigerator for several days. I prefer to work with the meat when it's fresh but have not noticed any definitive difference in the final product, either way.  This may be because I usually end up freezing most of the final products after curing and smoking anyway.
Once thawed I separated all the pieces by type of smoking, ending up with 45 lbs of jowls, bellies and chops for cold smoking and about 15 lbs of capos and shanks for hot smoking.  With this information I could figure out how much of each type of curing mix I needed to make and how long the pieces should cure.
Making the cures is easy and I'll be posting the recipes use soon.  Careful measuring/weighing of ingredients is important, especially for the curing salt required.
 I made the cold-smoke bacon cure first and slathered the bellies, jowls and chops well with the mix.  They all got packed into a large Rubbermaid storage container and set in a 38 degree F refrigerator where they will stay for about a week, getting turned and re-coated every few days.
The cold-smoking meats in their smear
The ham brine is a much more liquid mix.  Once it was made I injected as much of the brine as possible into each piece of capo meat and shank, then submerged them in the remaining brine and refrigerated.  They too will be agitated every few days for about a week.
Injecting the cure into the meat

To be continued...

Friday, January 21, 2011

Personal Cheese Update - 2011 Brie #1


The three Bries I made just before Christmas were scheduled to be ready to try today and since Kathryn just returned this morning from a week-long trip across the country visiting family and friends, I thought it would make a nice lunch with some fresh bread.

All three cheeses have been ripening in a 50 degree F aging box, wrapped in parchment paper, then aluminum foil, getting turned and flipped about twice a week for the last few weeks They felt like they were all softening so I pulled one out to come to room temperature about an hour before lunch, loosening the wrappings so it could breathe a little.


As I started to cut into the cheese the skin broken slightly and some lovely, white proteolyzed* cheese goo leaked out.  I was surprised upon continuing the cut that the proteolysis had not penetrated further and more evenly.  While definitely ripening throughout, the softest pate was segregated to the outside layer, just under the white mold (penicillium Candidum) skin.  Just to be clear, and as gross as it may sound, proteolysis is a good thing!  We like our Brie soft and gooey and "protein degradation" is how that happens.

Regardless, we each took a wedge and some sliced bolillo bread. The cheese was very good with a rich mushroomy flavor all the way through and while still a little too firm in parts, completely spreadable.

A good experiment.  I think I'll keep the two unopened Bries in their 50 degree F environment for another week while I research possible causes for the uneven ripening. The cut cheese will go to the regular fridge, re-wrapped in parchment and foil.

*Proteolysis is the directed degradation (digestion) of proteins by cellular enzymes called proteases or by intramolecular digestion. In this case the molds acting on the proteins in the cheeses.


1/22/2011: Took some of the Brie, spread it on thick slices of homemade bread, topped it with some sundried tomatoes and slivers o fresh garlic and toasted it in a hot oven for about 10 minutes.  Result... Fantastic!