Search This Blog

Monday, April 25, 2011

Ham and Beans

I finally had the chance last week to use one of the ham shanks I'd cured and smoked a few months ago.


We were entering a very busy stretch as we approached the grand finale of this year's  kidding season with 10 does expected to kid within 5 days.  This was, of course, on top of our regular milking, cheese-making and other ranch duties.  It was more than the two of us could handle well so we asked some people Kathryn had met while giving a talk to a 4-H group if they wanted to help out.
Both the mother and daughter wanted to help over the course of the week but each had various schedule conflicts during that time so it worked out that one would come for a few days, then the other would come for a few days then the other would come back again for the big finish.  They would be staying in our Bunkhouse overnight (as there is no telling at what time of day a goat is going to kid) and we'd be supplying meals etc.
We expected to be ridiculously busy even with their help so I wanted to have a number of easy, heat and eat meals ready to go. One of the meals would be based on a big pot of Ham and Beans that I could make up a few days in advance and then just re-heat to serve.  This use is perfect as Ham and Beans improves with a day or so of letting the flavors marry and meld after  it is first made.
The way I make Ham and Beans it can either be eaten like a thick stew or thinned down a bit for a soup.  I personally prefer the stew but either way it is a full and satisfying meal, especially accompanied by something like a pan of cornbread hot out of the oven.
Ham and Beans
1. Rinse, clean and soak 1 lb of dried small white beans in triple their volume (or more) of cold, clear water for at least 12 hours.
2. Drain and rinse the beans in fresh water then put in a pot and cover with about three times their volume of clear water.  Cover, bring to a boil then reduce to a simmer.  Cook several hours until the beans are just tender but not soft or falling apart.
3. While the beans cook prepare about 4 cups of mirepoix, roughly equal parts of 1/4" diced carrots, onion, and celery.
4. When the beans are at the tender stage, add a smoked ham shank or two (depending on how meaty they are). Add more water to almost  cover the shank if necessary.
5. Simmer until the meat begins to loosen from the shank bones.  Add the mirepoix and continue cooking until the meat falls off the bones and the veggies are tender. Remove from heat.

6. Remove the shanks and meat from the stew.  

      When cool enough to work with remove all of the meat from the bones.  Pick through it carefully, removing all sinew, veins, cartilage etc, then cut the meat into 1/2" pieces. 
7. Skim any fat that has risen to the top of the stew.  Add the meat back to the stew and re-heat to eat or chill for later use.

Sunday, April 24, 2011

Asparagus


'tis spring, 'tis spring
Da boyds is on da wing.
My woyd!
How absoyd!
I thought da wings was on da boyds!
(an old family rhyme, origin unknown)

It's spring on the Ranch.  This year, as usual, the arrival of spring ushered in our annual windy season. Wicked winds, gusty winds, sustained winds, sandstorm winds.  Very unpleasant indeed.  It makes outside work much more difficult and wreaks havoc in the gardens.
Not only do the wind storms make starting vegetable seeds and plants outside risky to the point of being a reckless gamble, the winds move so much sand around that even well-established perennial plants can have a rough time of it.  It is not unusual for me to have to take our tractor bucket loader and remove 24-30 inch-high "blow sand" dunes from the garden several times between March and June.
Other than the wind, the official arrival of spring (at least in my mind) is heralded by the almost-miraculous appearance of the first stalks of asparagus. They are miraculous from the usual point of view that it's like magic to see those beautiful sprouts pushing up through the cold, hard soil every year but also that they can further withstand the relentless assault of wind and sand and be so productive. 
One year I was not able to get into the garden for weeks after a bad sand storm.  Eventually I got to the asparagus bed and started digging it out, using a flat-bladed shovel. To my surprise, my first shovelful not only removed a bunch of sand but it also cleanly cut and exposed about a dozen gorgeous white asparagus stalks!  This, of course, is how this great culinary delicacy is intentionally grown... as the first shoots of asparagus begin to show through the ground they are covered up with a few inches of soil.  This is repeated every time the shoots begin to show until they are large enough for harvest.  Preventing exposure to sunlight keeps the chlorophyll from greening-up the plants and limited exposure to air keeps them very tender.  Anyway, that year we had a nice harvest of a truly special accidental vegetable crop.
Despite some wild winds this year, the asparagus bed has somehow remained pretty clear of sand.  Maybe my wind screens (both vegetative and manmade obstacles) are finally starting to work. For whatever reason, the asparagus are doing great!  Since our first harvest a few days ago we have had daily yields of from 12 to 30 beautiful, thick and tall spears and they have been on our plates for every dinner.
Today's asparagus harvest
(and some tomatoes from the greenhouse)
Our asparagus usually goes from the garden directly to dinner prep but if I need to store them for a short while I'll give them a quick rinse in very cold water, wrap a moist paper towel around the base end of the bundle then wrap the whole bundle lightly in plastic wrap, leaving the top end open for ventilation.  The asparagus will last in the fridge veggie drawer this way for a couple of days with very little loss of quality.
Pan-Roast Asparagus
My favorite way to prepare asparagus is a very simple pan-roast. 
First I wash them really well.  Even though the sands are not piling up on them it is certainly blowing around a lot and they - especially the convoluted little heads - need lots of running water to prevent gritty food. 
After washing I'll trim the bottom ends just enough to remove where the skin is a bit tough. If the skin seems to be tough up more than an inch I will sometimes peel the bases. I'll then wash the spears one more time.
Next I heat a little butter in a sauté pan over medium-high heat.  When it is hot I put in the spears (trying to keep them all oriented the same direction for ease of cooking and subsequent serving) and give them a good sprinkle of salt and pepper.  Shake the pan fairly frequently to make sure that all the the individual spears get even pan-contact time.  If there is a lot of disparity in spear sizes - not an unusual occurrence for home harvests, I may withhold the smaller ones and add them part way through cooking the larger spears.
Cooking only takes a few minutes and I like them best if a few get a tiny bit of pan browning started.  Avoid too much browning or risk them tasting bitter.
Pan-Roasted Asparagus
This is one of the easiest, fastest and best vegetables there is, made especially good with freshly home-harvested spears. I could eat pan-roast asparagus at every meal, year 'round but the season is short so I'll just enjoy it while I can. 

Saturday, April 23, 2011

Mac & Cheese

I have a confession to make. I have a few blue boxes of Kraft Macaroni and Cheese in my pantry, and worse... there used to be more of them. 

Yes, it's true.  Despite the fact that we grow almost all our own food right here on the Ranch -  from vegetables to beef, pork, chicken, duck etc; despite the fact that we are a certified goat cheese dairy, and make our own cheddar, Gouda, jack, Swiss, Havarti  etc cheeses; and despite the fact that I am a highly-trained and experienced former professional chef... Kathryn and I do, every great once in a while, make and eat boxed macaroni and cheese.
In our defense, it's always some sort of "special situation" that warrants breaking out a blue box.  It's usually one of those days when I'm working on a project that I can't get away from all morning that drags on way past lunch time and there's nothing in the fridge that Kathryn can easily heat up.  Barn cleaning day is a classic mac & cheese day as I'm stuck on the tractor all day.  K gets out the blue box and  whips out lunch (usually with the addition of some of our homemade smoked sausages) and calls me in for a quick break when it's ready.
Personally, I've attempted to make blue box mac and cheese just once.  It was about 4 years ago, and it was a total disaster.  I missed the part of the directions where you add the milk and stirred the dry powder directly into the cooked macaroni.  Oh-Lordy what a mess!  The whole thing seized up in about 10 seconds to the point I thought I was going to have to throw it all away - pot, spoon and all.  Completely inedible.  Since then mac-in-a-box duties have fallen solely to Kathryn. 
What can I say?  It's not a very good product, but at least it's a lot faster and easier than from scratch.
Or is it?
A few days ago I made a big batch of Baked Macaroni and Cheese and knocked it out in such short order (while doing a whole bunch of other things at the same time including helping birth-out a couple of goat babies) that I've come to the conclusion that the real deal is just as good a deal to make.
To start with, my recipe is drop-dead simple:
                         B M R Baked Mac & Cheese
Yield:   1, 4" Hotel Pan
Ingredients
2 Pounds  Elbow Macaroni
1 Gallon  Milk
4  Pounds  Cheese Blend , Shredded (see note)
Seasonings To Taste:  Granulated Garlic, Granulated Onion, Salt
As Needed:  Blond Roux (see note)
3 Pounds  Seasoned Fresh Bread Crumbs (see note)
Method
1. Boil the macaroni in plenty water until very tender.  Drain well.
2. Combine the milk and shredded cheese and heat on medium, stirring regularly to avoid sticking, until very hot and cheese is melted
3. Season to taste with garlic, onion and salt
4. Add the roux and bring to a simmer, stir almost constantly until thick, adding more roux as necessary .  Cook on very low heat for a few minutes.
5. Toss the macaroni in the sauce and pour into a lightly greased 4" hotel pan
6. Top with seasoned crumbs and bake, uncovered at 350F (325F convection oven) for about 45 minutes until bubbly all over and crumbs have browned nicely.
NOTES :
1.  Cheese blend: cheddar, jack, havarti, and/or gouda etc your choice.
2.  Blond Roux: equal parts by weight butter and flour, cooked over very low heat for 10-15 minutes without browning at all.  Rule of thumb: add cold (room temperature) roux to hot liquids or hot roux to cold liquids. Do ahead.  Always keep some on-hand.
3.   Seasoned Fresh Bread Crumbs: Fresh bread pulsed in a food processor with salt, pepper, granulated garlic, granulated onion, parsley and a little olive oil to a medium-fine crumb. Can be done ahead.  Can be frozen for future uses.

Of course, my elbow macs didn't take any longer to cook than the ones that come in the blue boxes nor were they any more difficult so that's a wash.
I always keep a container of roux at-the-ready so the sauce only took about 15 minutes:  While the pasta was cooking I started heating the milk.  While the milk heated I grated the cheese (took about 2 minutes to cut into chunks and chip fine in the food processor) then added it to the milk.


Once the cheese was out of the food processor bowl it was only another couple of minutes to make the fresh bread crumbs in the same bowl - no need to wash between. 
By that point the sauce was ready for thickening. 

While the sauce simmered I drained the elbows.  When the sauce was ready I tossed in the elbows.
At this point you have something akin to the boxed product (but infinitely better) in about 20 minutes - but I wanted Baked Mac & Cheese.
I poured the macaroni and cheese sauce into the hotel pan, topped it with the crumbs and put the pan into the pre-heated oven.  About 45 minutes later it was perfectly done.  Time to eat.

This was some real top-notch Mac & Cheese and it wasn't a whole lot more time or work than from the box.  And an added bonus... this recipe makes a LOT!  Even after a couple of meals featuring Baked Mac & Cheese, I was able to freeze 8, 2-person portions so future meals are as easy as popping them into the microwave or oven to heat.  Faster AND easier (and way better) than the blue box stuff!

Wednesday, April 6, 2011

Bagels

We don't have breakfast around here very often.  Mornings are always full and often hectic with the morning chores, feeding all the animals, milking the goats - which leads right into the day's cheese-making activities etc.  By the time we've stopped to catch our breath, it's 10am - too close to lunch time for a meal.
Some days, we know lunch is going to be very late (order processing days are infamously so) so we'll try to grab a little something in the morning to tide us over.  Maybe a piece of fruit or a muffin, but our go-to breakfast of choice is a toasted bagel with freshly made goat cheese, just out of the draining bags.
For the longest time we struggled with finding a good source for bagels. We're 100 miles form the nearest bagel bakery (not that Arizona is exactly well known for the quality of it's bagels to start with!) and the grocery store bagels we'd tried were insipid imitations at best.  "Bagel-shaped bread" Kathryn called it.
There is one little bagel shop in Tucson we'd discovered when we lived there that could make a really good bagel (depending on who was baking that morning).  In the years since we moved to The Ranch I'd make it a point whenever I was in town to pick up a couple of dozen to carefully bag and freeze upon getting home.  We'd dole out those bagels like they were solid gold.
As our time up here went on, I found my need for trips to Tucson getting fewer and farther between.  What had, at one point, been trips down about every other month became 2 or 3 times a year.  Now I get down there maybe once a year.  We needed a new bagel source.
The obvious solution was to make them ourselves.  I'd been baking for 35 years but, for some reason, had never attempted bagels.  I guess they seemed too complicated and specialized to be able to do a good job of on a small-scale/home basis. I knew there were several cooking steps and had read a couple of recipes that called for things like "Non-diastatic Malt Powder", whatever that was.
Whatever my phobia/excuse/aversion, it was time to "man-up" and learn to make bagels.  I read everything I could find about the process and while there were plenty of "easy", or "one-step" types of recipes out there, the more I looked into it, the more I became convinced that there were no good short cuts, cutting corners or substitutions that didn't, in some way, act to the detriment of the final product. 
If I was going to do this I was going to do it right so I took several well respected and authentic formulas (some for practically industrial quantities) and made a melange of their similarities and differences and came up with a solid, scaled-to-home-use base, from which to start. I also ordered some of that mysterious Non-diastatic Malt Powder online.  By the time it arrived, I was ready to give it a shot.
Let's just say the first batch was a "learning experience".  It's not that they were inedible, or anything, but they needed a lot of help.  For one thing, I didn't realize how much they would grow through the boiling and baking processes.  Called "oven spring", the rapid expansion of the dough when it meets high heat is a combination of the yeast's gas-producing effect briefly increasing and the expansion of the dough as some of it's moisture turns to steam.  Anyway, I didn't account enough of it and my first bagels ended up without any holes at all and were more like large rolls.  On the up-side, the flavor was excellent, the texture was dense and chewy and the crust was shiny and crisp.  In short, a pretty good bagel (if you didn't look at it).
A couple of tweaks to the recipe and some re-thinking about how I was forming the dough and I was ready for another shot.  They came out MUCH improved in form and just as good otherwise. I made some notes for a few small changes.
Subsequent batches went easier and easier.  I optimized my set-up so it took less space, time and clean-up.  I converted the mish-mash volume/weight/measure/English/metric ingredient list to primarily metric weight to ensure best possible future repeatability (something I've been working towards on most of my recipes for years).
Anyway, this morning I made bagels.  "Everything bagels" are our favorites and so that's the type I made this time.  The process was smooth and fluid and while, sure, bagels have a few more steps than a loaf of white  bread, it's hard to remember what all the drama was about in finally making my first ones.
Here's my recipe and some process pictures...
BMR "Everything" Bagels

Yield: 12 Bagels
Ingredients
12 Grams Dry Yeast
70 Grams Non-diastatic Malt Powder
24 Grams Sugar
1 pint Warm Water
720 Grams Bread Flour
16 Grams Salt
As Needed (about 300 grams total) Topping: Your choice combination of: Sea Salt, Poppy Seeds, Sesame Seeds, Onion, Garlic, Caraway, Etc.
For Water Bath
3 Quarts Water
50 Grams Non-diastatic Malt Powder
24 Grams Sugar
Method
1. Combine the yeast, malt and sugar in a mixer bowl
2. Add the warm water, mix, and let the yeast proof for a few minutes.
3. Add the flour and the salt then knead the dough till smooth.
4. Shape the dough into a ball place it in a lightly greased bowl covered with lightly greased plastic wrap, and allow it to rise till doubled in bulk, 1 to 1-1/2 hours.
5. When the dough has risen, release the air and transfer it to a clean work surface.
6. Put the water into a 4-5" deep pot about 10" in diameter -- the water should be about 3 inches deep -- and add the malt and sugar. Bring the water mix to a boil while shaping the bagels.
7. Scale the dough at about 3.5 oz (100 grams, .22 lb) which should make about 12 pieces. Roll the prices into balls.
8. Working with one piece of dough at a time, shape it into a ball, poke a hole through the center with your index finger, and twirl; the dough will form a ring.
9. As you get 3 or 4 bagels ready, boil them immediately for chewiest bagels, or let them rise a bit (see notes). Keep the water bath at a simmer. Don't crowd the bagels in the water. Simmer them for about 30 seconds on each side, then drain briefly.
10. While still hot and moist, dip the bagels top and bottoms, in topping mix, then move them to a parchment-lined sheetpan, liberally sprinkled with corn meal.
  

11. Bake the bagels in a preheated 425°F oven for about 20 minutes, or until they are a deep golden brown.


NOTES :

Second rise or not?
Boiling the bagels immediately after shaping will produce chewy, dense bagels. Letting the bagels rest and rise for 30 minutes or so after shaping, will yield a lighter, puffier bagel. Be advised that rising the bagels before boiling will make them more fragile and more difficult to handle (they will want to deflate in the water bath).
What's with the "Non-diastatic Malt Powder"?
Malt Powder improves the flavor of the bagels and, more importantly, when used in the water bath it gives them a shiny crust. Non-diastatic malt powder is made from sprouted barley kernels which have been roasted (to intensify their natural sweetness), ground, filtered in water (to remove husks and bran), then dehydrated. The resulting powder, has a characteristic sweet caramel taste and aroma. Regular (diastatic) malt retains enzymes which gives yeast a boost - a desirable characteristic in some applications, but not for bagels. Non-Diastatic Malt is much more stable here. Too much Diastatic Malt might cause the bagels to collapse or even start breaking a part in the simmering water.

Sunday, April 3, 2011

Roast Duck Dinner (From Post Office to Plate) - Part 4

Duck tonight!  Time to do the "final assembly" of all the components for our duck dinner, at last!
Three days have passed since we butchered the first duck and I start the day with 6 VERY nicely cleaned,  plucked and rested,  feet-on ducks.  I figure I have just enough room in my commercial convection oven to roast them all at the same time.  This allows me some economies of scale and conservation of energy consumption.
The first step is to make up a big batch of aromatic-rich mirepoix.  I used 2 lbs of carrots, one large head of celery, four medium onions, and one head of garlic,   I chopped all of this coarsely and added about a cup of fresh rosemary leaves, some salt and ground black pepper and tossed it to mix well.
Rough Mirepoix
To prepare the ducks I cut off the feet, necks, fatty skin flap around the neck and knuckles off the legs.  These all go on the bottom of the roast pans along with a little of the mirepoix. I then folded each wing back onto itself, tucking it under the body.
Next I filled the body cavity of each duck loosely with the remaining mirepoix, rubbed the exteriors with a little dark soy sauce, arranged them, breast side up, in the roast pans and popped them in the preheated 350F oven.
While the ducks cooked I started the wild rice pilaf that would accompany them at dinner.  I started by measuring out 2 cups of wild rice, covering it with water in a small sauce pot and bringing it to a boil then quickly draining it ("blanching"). 

While the rice blanched, I cut up another aromatic mirepoix (carrots, celery, onions and garlic), this time diced about 1/4" (garlic fine chopped) and began sautéing it in a little butter.  When it was almost soft I added some chopped thyme and rosemary to cook for a minute or so before removing it from the heat. I brought 8 cups of well-seasoned chicken stock to a boil.
I put the blanched and drained wild rice in a lightly oiled 2" hotel pan, stirred in the sautéed mirepoix and poured on the boiling stock. A quick stir to distribute everything evenly, then I covered the pan with plastic wrap followed by aluminum foil and popped it in the oven.
Back to the ducks.  After about an hour I turned each of the ducks so they were breast-down.  The mirepoix was browning nicely but not getting too dark so back in the oven they all went.
I checked the rice after an hour in the oven and it still had a ways to go but was coming nicely.
After the second hour in the oven for the ducks they got flipped again (breast side up again).  I often find that with store-bought ducks they are very close to being done at this point and a little crisping of the breast skin is all that is needed. These ducks were not nearly ready yet.  I suspect it was because of their age (quite a bit older than commercially prepared birds) but for what ever reason, they needed some more quality time in the oven.  The mirepoix was darkening and there was very little liquid remaining in the bottoms of the roast pans so I added a little water to each to prevent scorching.
To my surprise, the ducks took nearly another hour to cook sufficiently at which time I took them out, removed them from the pans to cool. 
I then set about deglazing the roast pans on the stove over hot flames with some red wine and water, scraping up all the brown bits. This would all go toward making the stock that would be made into a sauce for the ducks so, the deglazing liquid went into a stock pot with the feet, necks and mirepoix from the pans.  
deglazing a roast pan
I covered the parts with more water and put the pot on the stove to heat while I continued working with the birds.
By this time the rice was fully cooked and very fluffy.  I poured it out of the hotel and onto a sheet pan to cool, then put into the fridge.  I've found that wild rice will tend to sour if not cooled and chilled quickly after cooking.
Once cool enough to work with, I de-boned the ducks.  Starting by tearing off the first two joints of each of the wings, then cutting each bird in half through the backbone and breast and removing the mirepoix from the cavities (goes into the stock pot) 


I proceeded to pull out all of the now-exposed rib, back, hip and breast bones, being careful not to tear the meat or otherwise mangle the birds.  Most of the bones (which of course also go into the stock pot) came out easily so all that was left in each half was one leg bone, one thigh bone and one wing bone.  This makes the duck halves sit nicely on the plate, be very easy to eat and gives me more bones for the stock!

mostly-deboned duck half
The duck halves then went into the fridge to chill while the stock cooked.
All My Ducks in a Row
After about 6 hours at a low simmer, the stock was a rich brown color, smelled great and some of the bones were just beginning to fall apart.  
Duck Stock Simmers
Time to strain. After removing as many of the larger bones as possible I strained the stock first through a coarse china cap (conical colander), then through progressively finer mesh strainers and finally through a sieve lined with cheesecloth.  
I skimmed off as much of the fat as possible (reserved for other uses) and cooled the nearly-clear stock in an ice bath before moving it to the fridge to finish chilling.
Time to make the sauce.  Duck L'Orange is the classic preparation for roast duck with a rich orange-flavored sauce but the same technique can be used to make any type of fruity sauce.  Today I was going to make one with blackberries.
I started by making a piquant caramel by combining sugar and red wine vinegar and cooking it to a thick syrup and then to a medium brown.  This base is what will give the sauce much of its sweet-and-sour kick.   

Piquant Caramel for Sauce
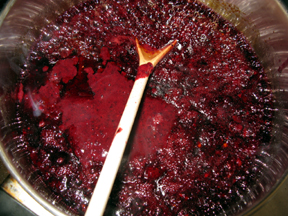
While the caramel was reducing I pureed some previously frozen blackberries with an orange.  These I added to the caramel when it reached just the right point to stop the cooking process (CAUTION! This is a little tricky and can cause violent sputtering of the molten sugar if you are not very careful). 

I cooked the blackberry/caramel mix a bit longer to further reduce and concentrate the flavors then strained the base through a fine sieve to remove the berry seeds, pressing to get every drop of base I could.
I retrieved the cold stock from the fridge, skimmed off the little bit more fat that had congealed on the surface and put some stock in a small sauce pot.  I added some of my blackberry base and began heating the mixture.  There are any number of options for thickening this sauce but arrowroot is usually my tool of choice.  I like the glossy, semi-clear look of the finished sauce but in this case I thought I'd try something a little different.  I made a quick roux from some of the reserved duck fat and flour and also dissolved some cornstarch in cold water and used a combination of the two as my thickeners.  The result was interesting.  It had the full body and mouth-feel of a demi-glace brown sauce but also the sheen of an arrowroot sauce.  I liked it.  A bit of tweaking of the flavor (touch more thyme, little more vinegar at the finish) and the sauce was good-to-go.
Putting it all together.  It's almost dinner time but these are big birds and we've been picking at the roast duck bones all day so we opt to have just 1/4 duck each tonight.  The duck half goes onto a sizzling platter, skin side up, with a little water on the bottom (to prevent drying of the exposed meat) and into a 450F oven.  This will heat it through and crisp up the skin in about 10 minutes.  In the mean time I reheat some of the wild rice in the microwave, and make sure the sauce is hot and ready.
Once the duck was ready it was time to eat!  I added a few sliced tomatoes, fresh from our green house to complete the plate.  At last, our own duck dinner!
It was absolutely worth the work and the wait but now you know why, when I buy a frozen duck at the grocery store, Kathryn calls it a "convenience product" or even "fast food"!