Search This Blog

Showing posts with label Ingredients. Show all posts

Tuesday, October 29, 2019

The Big Myth about Cooking Foods with Alcohol

How many times have you read or heard that the alcohol in vanilla extract bakes out in a cake? Or that all that red wine in your spaghetti sauce or boeuf bourguignon leaves only its flavor after cooking? Or that when you flambé your crepes Suzette with Cointreau, or your bananas Foster with rum, that the flames are burning off all the alcohol in it?

Well, the truth is… each of these culinary myths is just plain wrong.
 
"It takes about three hours of hard cooking to eliminate all traces of alcohol in most foods."
The Study

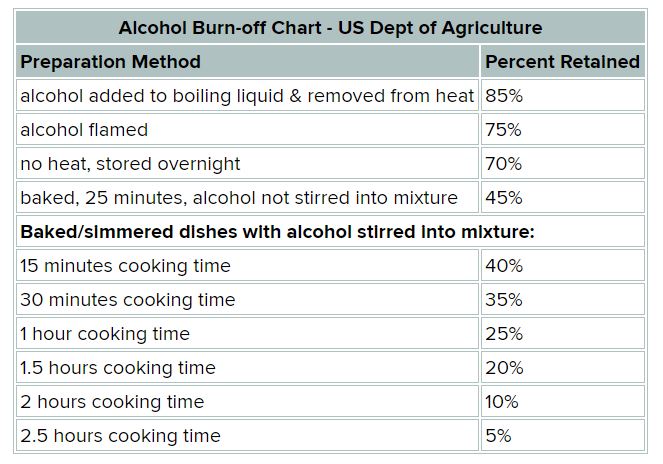
According to the U.S. Department of Agriculture's Nutrient Data lab, food with alcohol in it that is baked or simmered for 15 minutes still has 40 percent of the original alcohol in it. After an hour of cooking, 25 percent of the alcohol remains, and even after two-and-a-half hours there's still 5 percent of it is remaining! Oh, and that flambé? As much as 85% of the alcohol remains! It takes about three hours of hard cooking to eliminate all traces of alcohol in most foods.

This is not new news.  In the study (originating in 1992 and most recently updated in 2007), nutritionists from Washington State University, and the University of Idaho together with the U.S. Department of Agriculture experimented with dishes cooked with wine and sherry. They cooked two wine-heavy recipes like boeuf bourguignon and coq au vin, plus a scalloped oyster dish with sherry. Varying methods, temperatures, cooking times, etc. gave widely dispersed results from 4 percent to 49 percent retained alcohol for the dishes.  None of the dishes were 100% free of their alcohol after the cooking. 


https://www.ars.usda.gov/ARSUserFiles/80400535/Data/retn/retn06.pdf

Why do we use alcohol in foods?
Most often, we add alcoholic beverages (wine, beer, spirits) to food to add specific desired flavors and aromas to the finished products.
Besides alcoholic beverages, most of the flavoring extracts we add to foods also contain alcohol (sometimes a lot!). Extracts are concentrated solutions made from drawing flavoring elements out of an ingredient like vanilla extract from vanilla beans. 

The alcohol in extracts can vary from 20% to 90% and primarily serves to preserve the aroma and taste of the original flavoring ingredient. The alcohol can also act as a carrier across mucous membranes, increasing the impact of the flavor profile as we eat it.

While extracts may contain a high percentage of alcohol, the total dose of alcohol is so low that the amount of alcohol consumed is miniscule. For example, 30 drops (roughly 1/3 teaspoon) of an extract that is 90% alcohol in 1 cup of water yields an alcohol content of 0.15%, equivalent to about 1/250th of a 12-oz bottle of beer or 1/320th of a 6-oz glass of wine.

So, if it's that little - who cares?


In fact, lots of people.  Even if 99.9% of the alcohol in a food is cooked off, there are plenty of people for whom even having the tiniest bit of alcohol or even the taste of alcohol may be unacceptable. Best practices dictate that food intended for children, pregnant women, and those trying to detox from alcohol should have NO alcohol in them. Likewise, for those who abstain for ethical, religious or health-related reasons.


Alcohol alternatives

Here are some ingredient flavor hacks to avoid using any alcohol in a recipe:
  • Instead of brandy, try mixing water, white grape juice, apple juice and peach juice in equal parts.
  • Cointreau, triple sec and Grand Marnier may be replaced with orange juice concentrate
  • Use rice vinegar instead of sake
  • Use white grape juice or slightly diluted white wine vinegar instead of dry vermouth.
  • You can replace vodka with apple cider and lime juice in equal parts.
When a small amount of alcohol retention is acceptable try:
  • Replacing Amaretto with a few drops of almond extract
  • For Anisette flavor use a bit of fennel extract
  • For any orange liqueur, a bit of orange essential oil will go a long way.

Sunday, April 24, 2011

Asparagus


'tis spring, 'tis spring
Da boyds is on da wing.
My woyd!
How absoyd!
I thought da wings was on da boyds!
(an old family rhyme, origin unknown)

It's spring on the Ranch.  This year, as usual, the arrival of spring ushered in our annual windy season. Wicked winds, gusty winds, sustained winds, sandstorm winds.  Very unpleasant indeed.  It makes outside work much more difficult and wreaks havoc in the gardens.
Not only do the wind storms make starting vegetable seeds and plants outside risky to the point of being a reckless gamble, the winds move so much sand around that even well-established perennial plants can have a rough time of it.  It is not unusual for me to have to take our tractor bucket loader and remove 24-30 inch-high "blow sand" dunes from the garden several times between March and June.
Other than the wind, the official arrival of spring (at least in my mind) is heralded by the almost-miraculous appearance of the first stalks of asparagus. They are miraculous from the usual point of view that it's like magic to see those beautiful sprouts pushing up through the cold, hard soil every year but also that they can further withstand the relentless assault of wind and sand and be so productive. 
One year I was not able to get into the garden for weeks after a bad sand storm.  Eventually I got to the asparagus bed and started digging it out, using a flat-bladed shovel. To my surprise, my first shovelful not only removed a bunch of sand but it also cleanly cut and exposed about a dozen gorgeous white asparagus stalks!  This, of course, is how this great culinary delicacy is intentionally grown... as the first shoots of asparagus begin to show through the ground they are covered up with a few inches of soil.  This is repeated every time the shoots begin to show until they are large enough for harvest.  Preventing exposure to sunlight keeps the chlorophyll from greening-up the plants and limited exposure to air keeps them very tender.  Anyway, that year we had a nice harvest of a truly special accidental vegetable crop.
Despite some wild winds this year, the asparagus bed has somehow remained pretty clear of sand.  Maybe my wind screens (both vegetative and manmade obstacles) are finally starting to work. For whatever reason, the asparagus are doing great!  Since our first harvest a few days ago we have had daily yields of from 12 to 30 beautiful, thick and tall spears and they have been on our plates for every dinner.
Today's asparagus harvest
(and some tomatoes from the greenhouse)
Our asparagus usually goes from the garden directly to dinner prep but if I need to store them for a short while I'll give them a quick rinse in very cold water, wrap a moist paper towel around the base end of the bundle then wrap the whole bundle lightly in plastic wrap, leaving the top end open for ventilation.  The asparagus will last in the fridge veggie drawer this way for a couple of days with very little loss of quality.
Pan-Roast Asparagus
My favorite way to prepare asparagus is a very simple pan-roast. 
First I wash them really well.  Even though the sands are not piling up on them it is certainly blowing around a lot and they - especially the convoluted little heads - need lots of running water to prevent gritty food. 
After washing I'll trim the bottom ends just enough to remove where the skin is a bit tough. If the skin seems to be tough up more than an inch I will sometimes peel the bases. I'll then wash the spears one more time.
Next I heat a little butter in a sauté pan over medium-high heat.  When it is hot I put in the spears (trying to keep them all oriented the same direction for ease of cooking and subsequent serving) and give them a good sprinkle of salt and pepper.  Shake the pan fairly frequently to make sure that all the the individual spears get even pan-contact time.  If there is a lot of disparity in spear sizes - not an unusual occurrence for home harvests, I may withhold the smaller ones and add them part way through cooking the larger spears.
Cooking only takes a few minutes and I like them best if a few get a tiny bit of pan browning started.  Avoid too much browning or risk them tasting bitter.
Pan-Roasted Asparagus
This is one of the easiest, fastest and best vegetables there is, made especially good with freshly home-harvested spears. I could eat pan-roast asparagus at every meal, year 'round but the season is short so I'll just enjoy it while I can. 

Friday, March 4, 2011

Winter Tomatoes

There's nothing better than winter tomatoes! 
Let me be more precise...
There's nothing better than fresh, warm-off-the-vine, red ripe tomatoes especially in winter. Believe it or not, that's something I've been taking a bit for granted recently.
We have a small greenhouse here on the Ranch.  It's original and still-primary purpose is for early spring seed-starting for the vegetable garden.  Several years ago it occurred to me that it went largely unused in the winter and decided to see what I could grow.  I'm not particularly interested in flowers so food plants (surprise, surprise) became the focus.
The Greenhouse in January
Getting the tomato plants started last fall
Pots of herbs and some salad greens have all earned their places of honor in the tightly packed space but it was the little tomato seedlings I set in the center bed that first autumn that really surprised me by taking off and, bearing fruit all winter long.
I've been growing a bed of winter tomatoes ever since. Some years have been good and others pretty dismal but the last couple have been phenomenal with regular harvests of 6 to 12 medium-sized tomatoes every 5 days or so.  As much as I love just eating sliced tomatoes as a side dish or wedges in a salad I've actually had to cook with some of them this winter because I can't keep up with their production.  When you start feeling like you HAVE to eat something, no matter how special it is, it loses some of its appeal.
I was fortunate to have two sets of visitors to the ranch over the past couple of weeks both remind me of just how wonderful they are and how lucky I am to have them.
The first visitor was a good friend from Phoenix who came for several days to help us with an intense section of our goat-kidding season.  I think we about worked the poor woman to death and don't know how we would have done it without her help.  There were just so many things going on at once and the hours were so long and difficult and the sleep so fleeting, that we had her picking up our slack in countless different ways. 
Yesterday's Harvest
One night I remembered that I hadn't even been to the greenhouse in days and asked her to run out there and see if there were any ripe tomatoes.  It took her a little longer than I expected but back she came with a nice basket of them, many of which made it to the salad we had with dinner that night.  She couldn't stop talking about the tomatoes and at one point, between bites, confided that all the tomatoes had not made it back to the kitchen - she had popped them off the vine into her mouth while picking the rest!
Then,  just today, we had some other friends from the other side of the state make the 6+-hour trip here to pick up some goat kids and a Dexter heifer which they had purchased.  They arrived early having made most of the drive in the pre-dawn dark so we offered them some breakfast (fresh fruit, sausage and egg hoagie sandwiches, and sides of home-fried potatoes, sliced tomatoes and some jalapeno peppers).  Again, the tomatoes, which I served simply sprinkled with a little salt, pepper and basil, were a big hit.
The "fresh legs" of a ball player coming off the bench can rejuvenate the whole team.  "Fresh eyes" on a project gone stale is a good way to jump-start problem solving solutions.  This week I've learned that "fresh taste buds" can work magic at re-inspiring a cook.
I am so lucky to have so many delicious and extraordinary ingredients to work with on a daily basis here.  From our Ranch-raised and butchered meats and poultry, to our own garden produce fresh or preserved by canning or freezing and, of course, all the wonderful fresh and aged goat cheeses we make here from our herd's milk.
I am going to try very hard not to take a single one of them for granted, ever again.

Sunday, February 6, 2011

Meat Grinding and Sausage Making 2011 - part 4

Today I smoked the hotdogs and Andouille sausages.
I set up the smoker, soaked the hickory chips for a while then fired it up.
Both the sausages I'm smoking today get hot smoked at similar temperatures but I had so many of them I couldn't do them all at the same time.  I chose to smoke the hotdogs first and moved them from the rack inside where they had been hanging overnight to the smoke box.
 
The hotdogs needed to be dried a little more so I kept the heat down to about 120F for the first 30 minutes, then wanted to apply a heavy smudge of smoke before setting the temp to about 165 for the rest of the smoking process.  Usually I just crank the heat up to high and smoke is billowing out in a few minutes but not this time.  The box got hot , but no smoke.  The only thing I can think of is that I hadn't drained the chips enough and they were still too wet to start smoldering (which produces the smoke).  Not wanting to cook the dogs too much before there was any smoke I pulled them out until the smoke got going.  It took about 20 minutes before the smoker was ready and I could put the hotdogs back in.
Then had trouble getting the temperature to settle down where I wanted it.  First it was too hot, getting near to 200F.  I made some adjustments to the flame and venting, came back a little while later and it was down to 140F.  It was a little windy today which is always a challenge and Kathryn noticed that the tank of propane I was using was pretty low both of which may have contributed to the problem. I changed out the propane but the temps still went back and forth a  few times before I finally got it to stay around 160-165F.
About 3 hours later, the dogs were at about 155F internal temperature so I pulled them out and with Kathryn's help sprayed them down with cold water.  This stops the cooking process, starts to chill them down and helps prevent the casings from shrinking too much which would lead to wrinkled, puckery sausages.
After examining the dogs after their shower I found that all that temperature fluctuation (probably in conjunction with some of the strings of dogs being longer than they should have been) had caused some problems.  A few of the lowest hanging dogs had gotten overcooked and a couple even dried and burnt a bit on the tips.  They were just too close to the heat source, I guess.  The ranch dogs will enjoy them just fine.  Fortunately, most of the hotdogs came out fine.
Once the dogs were out, I hung the Andouilles in the smoker and adjusted the temperature to 180.  It stayed pretty well around this number for the whole time and about 4 hours later the sausages got to 155F (internal temperature) and were done.
I pulled them out and, again, gave them a good spray of cold water for cooling and to tighten the casings, then popped them into the fridge.
 
I hope to package and freeze both these types of sausage tomorrow.
In other food news…
For lunch today we opened the second (of three) brie I’d made starting in December.  I’d left this one in the 50F ripening fridge for a couple of week longer than the first and it was much softer all the way through but also quite a bit stronger flavored.  I liked it a lot but there's no denying, it was pretty feisty for a Brie.
I spent a little time in the greenhouse this morning, watering a few things and picking tomatoes.  Red, ripe, sweet and juicy home-grown tomatoes in February.  The bushes, which have all but taken over the entire growing space have been giving us a few tomatoes every week since August and this week was no exception.  Here’s today’s haul (it’s hard to tell from the picture but the one in the upper left corner is over 3 1/2" across)...

Monday, January 24, 2011

Making Butter


Yesterday I mechanically separated cream from 10 gallons of our goats' milk and got 6 quarts of heavy cream.  Today I'll be churning that cream into butter.
I have a butter churning attachment for my cream separator but have found that it takes a very long time to get it to churn.  It is also very tiring as my machine is hand-cranked and the turning becomes quite difficult as the cream "gathers" into butter.
There are any number of methods for churning butter.  You can make whipped cream in a mixer and over-whip it until it turns.  The same thing can be done in a blender.  Small batches can be done with a quart jar and a few small marbles, hand-shaken to churn.  With so much cream to churn I turned this time to my  14-cp Cuisinart.
The process was fast and simple.  Again, as for separating the cream, temperature is the key.  I brought my cream to cool room temperature (about 55 degrees F) and processed it in batches until it separated nicely.  You don't want to over-process it or you risk heating the fat too much, making the cleaning process more difficult.
 
 
 As the batches got churned I moved the gathered butter into a colander to drain.  The liquid that comes out of the butter is buttermilk and is excellent for use in many cooking and baking applications.
One thing about making butter from goats milk you will notice right away is the color.  It is pure white.  The reason for this is the same as the reason that natural goats milk cheeses are also very white.  The creamy or light yellow color you see in natural cow's milk cheeses and butter come from carotene (a group of several related hydrocarbon substances).  Goats almost fully metabolize nearly all the carotene they ingest while cows pass some of it through into their milk, causing a slight coloration.  Today most commercial butter and many cheeses are additionally colored with annatto, a yellow/orange plant-based food color.
Once all the batches are churned, The butter needs to be worked and washed.  Most instructions for making butter call for it to be worked with a set of paddles.  I find that working with my hands is just as effective.  The only down-side is that you will be working the butter in ice water so it's mighty cold!
The purpose of washing and working it to completely remove any residual buttermilk from the butter.  The buttermilk will go sour and even small pockets of it remaining in the butter will contribute quickly to "off" flavors and eventual premature rancidity.
Once well-washed I lightly salt my butter with fine sea salt.  I used about 3/4% salt by weight in this optional step.   Salting brings out the full flavor of the butter for when it is used on toast, etc. and also acts as a minor preservative.  Unsalted butter is also known as "sweet butter".  Many baking and pastry recipes will call for unsalted butter.
My final yield today from the 6 quarts of cream was 5 1/2 lbs of butter. 
We packed the butter into 8-oz containers, labeled and froze them.  They will be as good as fresh for several months but should be used within a year.


Another type of butter, "cultured butter" is made the same way but the cream will have had a lactic bacteria added to ripen it prior to churning.  This results in a more complex flavor to the butter.

People often  ask us why we don't make goats milk butter commercially.  Our off-the-cuff answer is  "You couldn't afford it".  Flippant perhaps, but true.  We value our milk at $20 per gallon. We reach this figure by calculating the average cheese yield  we get out of a gallon of milk and multiply that by our average sales price for that amount of cheese.  Using today's butter yield (5 1/2 lbs from 10 gallons of milk), if we made the butter to sell we'd have to get $36 a pound for the butter or we'd lose money having not made it into cheese.  Also, as I mentioned in the previous post, the cream  yield I got yesterday from this rich  winter milk was exceptional, more than twice my normal summer yield.  Using the much more abundant summer milk as a basis we'd have to charge nearly $80 a pound to justify not making cheese with that milk!

Sunday, January 2, 2011

2011 Produce Garden Plan


It looks like I have my produce garden plan done for this coming year.  The plan is very similar to last year's phenomenally successful garden with a few changes:
Fewer eggplants, more carrots, beets, and greens. A couple of minor changes to the varieties I'll be planting etc.
The overall garden space is about 60'x60' and it is watered by a modular series of drip irrigation manifolds and hoses.  We have a sturdy shrub called cotoneaster planted along the south and west fence lines to help mitigate the effects of our ferocious spring winds.  There is an asparagus bed on the south and a perennial herb bed on the east side.  The rest gets rotated through various types of plants every year.  We try hard not to place plants in the same family (say, nightshades) in the same locations from year to year to help prevent the build-up of diseases or depletion of the soil.           
The whole gets a deep bed about 8-10" of well-composted manure and barn cleanings spread over it early each spring.
Here's a picture of this year's plan (click on the picture for a full-sized view)...

Once I have a plan, I can put together a seed order.  As we get more experienced in high-elevation gardening and find varieties that work well for us here the seed-ordering gets easier and easier.  This year all I had to do was repeat last year's orders with a few small adjustments.
Again this year I found myself ordering primarily from two sources: Fedco Seeds  and Tomato Growers Supply.  Here's what I've ordered so far (comes out to just over $100 in seeds):

0893 - Sugarsnap Snap Pea OG ( A=2oz) 2 x $2.00 = $4.00
1409 - Raven Zucchini ( A=1/8oz) 2 x $1.80 = $3.60
1580 - Sunburst Patty Pan Summer Squash ( A=1/8oz) 2 x $2.00 = $4.00
2051 - Nantes Fancy Carrot OG ( A=1/8oz) 1 x $1.80 = $1.80
2182 - Detroit Dark Red Short Top Beet ( A=1/8oz) 2 x $0.70 = $1.40
2550 - Tyee Spinach ( A=1/4oz) 1 x $1.10 = $1.10
2712 - Black Seeded Simpson Lettuce OG ( A=2g) 1 x $0.90 = $0.90
2713 - Green Ice Lettuce OG ( A=1g) 1 x $1.50 = $1.50
2761 - Red Sails Lettuce OG ( A=2g) 1 x $1.60 = $1.60
2811 - Buttercrunch Lettuce ( A=2g) 1 x $0.70 = $0.70
2865 - Rouge dHiver Lettuce ( A=2g) 1 x $0.70 = $0.70
2910 - Michelle Lettuce OG ( A=1g) 2 x $1.00 = $2.00
3166 - Forest Green Parsley ( A=1/16oz) 1 x $0.70 = $0.70
3303 - Tendergreen Broccoli ( A=0.5g) 2 x $1.20 = $2.40
3313 - Fiesta Broccoli OG ( A=0.2g) 2 x $2.20 = $4.40
3324 - Arcadia Broccoli ( A=0.5g) 2 x $1.70 = $3.40
3685 - Black King Eggplant ( A=0.2g) 1 x $1.40 = $1.40
3764 - Early Jalapeno Hot Pepper ( A=0.5g) 1 x $0.70 = $0.70
3796 - Habanero Hot Pepper ( A=0.5g) 1 x $1.00 = $1.00
3837 - Revolution Sweet Pepper ( B=0.2g) 1 x $3.80 = $3.80
3839 - Valencia Sweet Pepper ( B=0.2g) 1 x $3.00 = $3.00
4055 - Rutgers Tomato OG ( A=0.2g) 1 x $1.20 = $1.20
4415 - Sweet Basil OG ( A=4g) 1 x $1.50 = $1.50
4422 - Mammoth Basil ( A=1g) 1 x $1.10 = $1.10
4461 - Purple Ruffles Basil ( B=1g) 1 x $3.00 = $3.00
4512 - Chives OG ( A=0.5g) 1 x $1.10 = $1.10
4515 - Cilantro OG ( B=4g) 1 x $2.40 = $2.40
4531 - Bouquet Dill OG ( A=2g) 1 x $1.00 = $1.00
4616 - Sweet Marjoram ( A=1g) 1 x $1.10 = $1.10
4672 - Summer Savory ( A=1g) 1 x $1.00 = $1.00
5409 - Mammoth Grey Stripe Sunflower ( A=14g) 1 x $1.20 = $1.20
9652 - Ixtapa Hybrid -30 seeds 1  $ 3.70   $ 3.70
9324 - Red Knight X3RHybrid - 30 seeds.  1  $ 3.95  $ 3.95
9262 - Early Sunsation Hybrid - 30 seeds.  1  $ 3.95   $ 3.95
9001 - Bell Boy Hybrid -    30 seeds  1   $ 3.10    $ 3.10
7157 - Florida High Bush Eggplant- 30 seeds 1  $ 3.10 $ 3.10
5646 - Burpee's  Supersteak VFN Hybrid 30 seeds 1  3.35 $ 3.35
4065 - Goliath VFFNT Hybrid - 30 seeds  1  $ 3.35  $ 3.35
3980 - Celebrity VFFNTA  Hybrid - 30 seeds 1  $ 3.65 $ 3.65
3310 - Big Beef VFFNTA  Hybrid- 30 seeds 1 $ 3.50  $ 3.50
15314- Walla Walla Onion plants - 150 ea 1 $16.99
14842- Sugar Ann Snap Pea seed pkt       $2.49

Wednesday, November 3, 2010

Pickled Peppers


Peter Piper picked a peck* of pickled peppers,

A peck of pickled peppers Peter Piper picked;

If Peter Piper picked a peck of pickled peppers,
Where's the peck of pickled peppers Peter Piper picked?
[An English language nursery rhyme and well-known tongue twister]

*A peck is a unit of dry volume equivalent to 2 gallons (8 dry quarts or 16 dry pints). Four pecks make a bushel.

The hard frost warning we noticed a few days ago got us back out to the garden just time for one last harvest session before everything was done for the year. Included in the bounty was about 1/2 bushel of jalapeno peppers.  
That would be TWO pecks of peppers, Peter!

 The Harvest

Today we processed the jalapenos and ended up with 14 quarts of pickled nacho-slices to add to the 15 quarts we'd processed earlier this fall and another 6 quarts of whole jalapenos.  That's a ridiculous amount of pickled peppers, but I bet we come close to running out by next year's harvest time.
Some of the season's bounty
 My process is simple and, because I never know how many peppers I'm going to be harvesting on any given day, my recipe is by-the-quart.

B M R Pickled Jalapeños

20 Each (approx)  Jalapeno Peppers, Whole, Cleaned and Slit or Sliced

1/2  Each                  Carrot, Sliced

1teaspoon               Dry Chop Garlic

1 Tablespoon          Dry Chop Onion

1 1/2 tablespoons  Salt

1 Cp (approx)         Water

1 Cp (approx)         White, Distilled Vinegar


1.    Pack the quart jar(s) half full of peppers

2.    Add the carrot slices.

3.    Measure the garlic, onion and salt into the jar(s)

4.    Pack the jar(s) full with the remaining peppers.

5.    Fill each jar 1/2 way with vinegar

6.    Fill the rest of the way (to within 1/2" of the top) with water. For whole peppers, poke around to dislodge air bubbles.

7.    Seal loosely with lids and rings

8.    Process in boiling water bath to the shoulder of the jars for 6-7 minutes

9.    Cool.  Make sure lids 'pop"

10.  Store in a cool dark place

Yield: 1 quart