I've always had a lot to be thankful for and
with Thanksgiving (my favorite holiday) right around the corner, I find myself
thinking about some of the big family gatherings we had when I was a child.
The magnificent spreads my Grandmother always laid out. How, as
children, we would wait to see how quickly "Uncle Jimmy" would fall
asleep on the couch after the meal (as he invariably did every year), snoring
so loud that the walls of the old farmhouse almost shook. The year that it
snowed so hard our family could barely make it the one mile back from my
grandparents' farm to our house. The sad first Thanksgiving after my
grandmother, the perennial culinary ringmaster of family gatherings, passed
away.
Some more recent Thanksgivings also stand out.
2000: A Bachelor Thanksgiving
For our very first Thanksgiving after having moved here to the Ranch in
2000, we had barely gotten running water and rudimentary off-grid electricity
going. The kitchen was effectively non-functional and Kathryn had to
travel to Kansas to see her family. The "bachelor Thanksgiving"
ended up being a pre-gurgitated turkey roll, instant mashed potatoes, fake
gravy from a powder and a store-bought mince pie, eaten all by myself. It
was completely pathetic.
1998 The Neighborhood Event
Then there was the time in Tucson AZ in the late 1990's when we invited
all our neighbors who "didn't have family" to dine with us. It
was a huge feast for which I prepared four types of turkey (traditional roast,
smoked, deep fried and grilled) plus dozens of sides, salads and relishes, assorted breads and rolls, all followed by 3
types of pie (pumpkin, mince and apple - with ice cream) - all home made,
from scratch, of course.
And speaking of different ways to cook a turkey, here's one Thanksgiving
that will always be remembered in our family...
The year of the Puddle Turkey
We were all gathered in Cornwall CT in the early 1980's. I was
put in charge of doing the turkey and stuffing for the family gathering.
Others were taking care of the sides and rest of the meal.
My mother had reminded me that there’s almost never enough stuffing to
go around for the requisite third helpings or for leftovers and to make sure
that there was plenty. Now, I have something of a reputation for
over-doing my cooking quantities and this was one of the few times I can ever
remember anyone in my family actually cautioning me not to make
too little of anything and I was up for the challenge.
My mom was right (of course!); there is almost never enough stuffing.
Many, many years before, a family holiday tradition was born in order to
help alleviate this problem. Realizing that the whole problem was that
the darned turkey birds were just too small inside (never mind that we never
cooked anything less than a 24-pounder) to hold enough stuffing, somebody had
the brilliant idea of making “Outside Stuffing” as well as the traditional
“Inside Stuffing”.
Granted, warming up a pan of stuffing is nothing new (restaurants
almost never actually cook any stuffing inside a bird for numerous logistic,
timing and health & safety reasons), but my ancestors decided that the
Outside stuffing should be something special. What they did was cook it
slowly for a LONG time, so long that the top half inch or so of the crust dried
almost completely into marvelously crunchy bites, almost like herby croutons -
only better. When mixed up, the Outside Stuffing was a real adventure for
the mouth, each bite a mix of moist, buttery bread intermingled with crispy
herbed crunches that explode against the teeth. Another big bonus of the
Outside Stuffing is that it can hold a lot more gravy (another turkey dinner
accompaniment of which there is seldom enough!) without getting soggy.
Wonderful good, that Outside Stuffing is!
Even with that one approach to the stuffing shortage problem already
accomplished and still I had been warned not to run out. What to do?
Well I figured the only other thing to do was to make more Inside
Stuffing. But how to do that? I mean a turkey is only so big on the
inside… or is it?? I had an idea!
I had heard about a Paul Prudholmn specialty called “TurDucEn”.
It was a Boned-out turkey, stuffed with a boned out duck, stuffed with a
boned out chicken, each of the birds also stuffed with a different and
appropriate stuffing. Paul’s trick was to bone out each of the birds
without breaking the skin, or cutting it apart in any way. In culinary
school I had seen a weathered old black chef de-bone a chicken without breaking
the skin (“keep da meat on da meat and da bone on da bone” he would mutter over
and over as a mantra as he worked) so I even knew the rudiments of what to do.
All I had to do was apply what I knew about doing a chicken to de-boning
a 20-something pound turkey whole, fill it up with stuffing and voila! With
all the bones gone there would be lots more room for stuffing right? Hey!
Even a bonus, I could brown up the bones, make a stock the day before the
big meal and be able to make extra gravy to boot. Great Idea!
Well, things never really go as one plans do they? As it turns
out turkeys are a lot tougher than chickens to work with. I mean their
bones can be BIG and hard and inflexible, much more so than those in a chicken.
I’ve done this exercise on chickens since then several times and they are
a piece of cake compared to that turkey. I swear it fought me every step
of the way, but I kept the “meat on the meat and the bone on the bone” as the
old chef had taught me and eventually it was done. Every single bone from
that bird, except those in the drumsticks and wings, was in a pile on the
counter and I was left with…
Well, it’s kind of hard to accurately describe what a big fully
de-boned bird looks like if you haven’t seen one. My wife had certainly
never seen one and it was at this time she strolled into the kitchen.
Kathryn is something of a traditionalist when it comes to holidays
(aren’t most of us?) and Thanksgiving is the kind of holiday where things are
supposed to be “just so” and not to be messed with. I had not told her of
my brainstorm for stuffing survival so she had no idea what I was working on
when she came in. For the longest time she just stood there staring at
the cutting board and the pink and white blob sitting there. After a bit
her hand came to her mouth and she said “OhmyGawd! That’s the TURKEY??!!”.
I did what I could to reassure her that it would turn out OK (though my
own confidence was a bit shaky by this time). I mean it really looked
BAD. I explained my whole plan and after taking it all in she finally
said she could see the potential of the project. Eventually we were
laughing pretty hard about the poor bird’s sorry/saggy looking condition.
Kathryn then came up with the less-than-complimentary (or so I thought at
the time) name for the dish of “Puddle Turkey” because of the way it
looked on the cutting board. The name has stuck to this day.
We played with the bird for a while, lifting up the different parts,
peering through the gaping hole in it from one end to the other, waving its
wings around etc. Eventually Kathryn says “Gosh, that’s really going to
take a LOT of stuffing to fill it up, don’t you think?”. I hadn’t really
looked at the size of the opening until now and I saw what she meant.
There was a LOT of room in there. The whole plan had been to be
able to re-assemble the bird, truss it up and roast it so it looked like a
normal holiday bird. Nobody was supposed to be able to tell it was
different until I, with a flourish of the carving knife in front of all the
guests, sliced clean through it’s middle, exposing all that wonderful stuffing.
Surprise!
Now I was a bit worried. We had stocked up on Pepperidge Farm
Herbed Bread Stuffing. (Let me interject here that I am an unabashed and
complete stuffing snob. There is no other stuffing in the world as far as
I’m concerned and if you come near me with any of that stove-top crap I’ll
likely throw it right back at you! So there!) Anyway we had 4 or 5
bags of stuffing which I quickly made up and shoved into the orifice. It
barely began to fill the void. Oh-oh. Kathryn was good enough to go
out and buy up the remaining stock of PF Stuffing at the nearest store,
returning with 8 more bags.
I made up two more batches of 4 bags each and started working in
earnest on the bird, getting the stuffing into every nook and cranny, making
sure to pack it solidly. I worked steadily and as quickly as possible,
trying to judge if Kathryn might have to make another stuffing run (she had
already called and confirmed the availability of 7 more bags between two different
stores within reasonable driving distance). I thought things were going
pretty well when I realized something. The stuffed turkey was getting
bigger than the whole un-stuffed one had been. The darned thing was
STRETCHING! It was puffing up like a balloon and getting all out of
shape. NOW what was I supposed to do? I wasn’t even sure it was
going to fit in my roast pan anymore. Arrrrrrrrrrgh!
A short time-out and a quick glass of wine later and I was calmed again
but no easy solution came to mind. The bird was getting harder to work
with, kind of floppy even with all the stuffing in it, I was getting really low
on more stuffing AND it just didn’t look right at all. Kathryn then made
some comment about the poor thing needing a face-lift, tummy tuck or maybe a
botox treatment. And I got another idea (Ain’t she a great inspiration?).
I gently rolled the bird over and did a big tuck on the backside,
gathering up several inches all along where the backbone had been and tied it
together with twine, taking up most of the slack in the body, in effect giving
it a lift! It worked pretty well. With a little more stuffing and
some minor trussing it did look mostly like normal stuffed turkey. It fit
in the roast pan with just a bit of persuasion and it even still fit in the
oven!
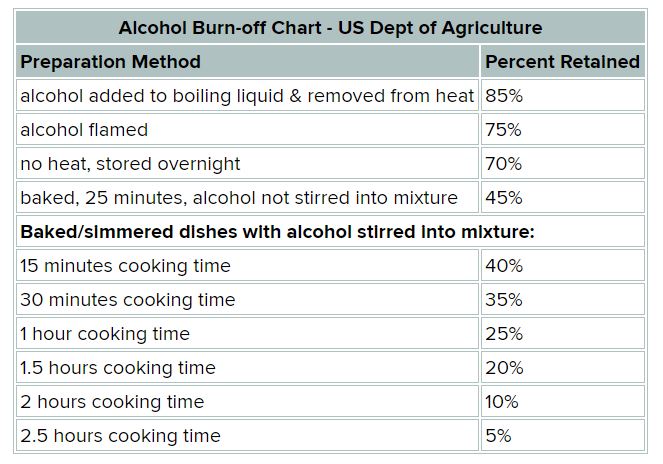
The cooking time was a little different than on any of the charts,
taking longer than usual because bones apparently conduct heat through the body
during the cooking of a normal turkey. I was prepared for this and it got
to the correct internal temperature and it came out, on time, with everything
else. After transferring it to the carving platter, I trimmed up a few
strings and brought it to the table. Nobody, at least, laughed or said,
“What the hell happened to your bird?” I really don’t think anybody
noticed anything different about it at all.
As planned I parted the beast right down the middle with a single clean
slice of the knife to the ooooohs and ahhhhs of everyone around the table.
The bird was well cooked and flavorful, the stuffing tasty and more than
plentiful. As a matter of fact there was actually too much stuffing, not
really a surprise having used 12 bags! Everybody thought it was a novel
and creative way of solving the stuffing dilemma but no one actually asked me
to do one ever again (which was most definitely just fine with me).
2010 Thanksgiving
Nowadays, here on the Ranch, we grow almost all of our own food.
From the heritage beef, whey-fed pork, and free range chickens we raise and
butcher right here, to the bounty from our gardens and greenhouse, every meal
is a kind of harvest festival for us but Thanksgiving is still a special
holiday. This year I think we'll go uber-traditional all around and leave the
Puddle Turkeys to someone else.
Here’s the full menu for T-day (subject to
modification)…
· Assorted Black Mesa Ranch goat cheeses
with "sour doe" toasts.
· Twin Roast Baby Turkeys*
· Bread Stuffing w/ Apricots & local
pecans ("inside" and "outside" versions)
· Giblet Gravy
· Buttery Mashed Potatoes
· Fresh Yams with cinnamon and chipotle
· Winter Vegetable Medley (carrots,
parsnips, turnips, rutabagas etc)
· Brussels Sprouts w/ Mushrooms in
Goats' Milk Sauce with nutmeg
· Cranberry Sauce (2 kinds)
· Deep dish Apple pie w/ homemade
vanilla bean ice cream
· Pumpkin pie, Bourbon whipped cream
* OK, these are not technically "baby
turkeys". I've never cooked a turkey smaller than 22 lbs for Thanksgiving
before (even if it was just the two of us) but the grocery store in town
apparently got severely shorted on their bird order this year and the biggest
ones they had were all under 14 lbs. So I got two. They look like big chickens
to me but I was lucky to get any at all.
Fair warning... It's getting into our
crazy time here at the Ranch with the Holiday crush coming on fast. This
will likely be the last post for a while!


