
I was able to
get back to the kitchen today and continue my meat grinding and sausage making
projects. I had gotten the beef ground yesterday, and the first grinding on
the lamb & various sausage mixes done the day before that.
Today I started
with grinding again, getting the ground lamb finished followed by the second
grind on all of the sausage mixes. Then it was time to start stuffing the
sausage meat into casings.
 |
| Ground Lamb |
When I talk
about "casings" i mean, of course, intestines. I buy two sizes of casings; 32-35mm hog
casings for Italian, Hungarian, and Andouille sausages, and 23-25mm sheep
casings for breakfast sausages and hotdogs.
They come well-cleaned and heavily salted in hanks of any number of
random length pieces. As a general rule
you need about 2' of 32-35mm casing per pound of meat and about 3 times that
for the smaller sheep casing.


In order to use
them they need to be soaked to remove the salt and soften the tissue. I've heard that putting a little vinegar in
the water helps with the softening but I've never had trouble doing it
without. After a soak and rinse, each
piece needs to be opened at one end and a little cold water run into the opening. The ball of water is then slid down the whole
length of the casing by picking up the opened end until it runs out the other
end. This slicks up the inside so it is
easier to slide onto the sausage stuffer
and ensures that there are no obstructions, knots or tangles. You want to work
organized here so that all the different casing pieces don't get tangled
together. Leave them in the water with a
small piece of one end hanging out of the water (so you can find it easily again) until you
need them.


Here's my
sausage stuffer. It has a cylinder
hopper for the meat mixtures and a hand crank that lowers a piston into the
cylinder, that pushes the meat out of a hole near the bottom. The hole
is fitted with one of several nozzles (different diameters for different
sized casings).


Once assembled
and the hopper filled, one piece of casing is carefully opened and slid over
the nozzle until all of it is accumulated along its length except for the last
couple of inches. If the casing pieces are very short you can thread several on
at once. A knot is made in the end that was left hanging and then it is
snugged up to the end of the nozzle.
There should not be any excessive air pockets or water left in the
casing or it will make pockets in the sausage.


To make the
sausage links, the crank is slowly turned with one hand. As the casing fills, the other hand supports the
sausage and slowly pays out the casing so as to regulate how much filling goes
in. Too much filing and the sausage will
burst, too little and the casing will be flabby. Depending on the types of sausage, the
filling action is suspended periodically so that individual sausages can be
twisted off. The trick to this is to
alternate each twist direction so the whole string doesn't unwind itself. I know this sounds counter intuitive but it
works.


Re-fill the
hopper as necessary. Once you get to the
end of one casing, a knot is made at the end of the last sausage, the next casing is loaded on the nozzle and the process repeats until you're
done. Today, I got all of the sausages
done into links except the hotdogs/wieners/frankfurters which still need to get
emulsified tomorrow before stuffing into casing.
 |
| Italian |
 |
| Hungarian |
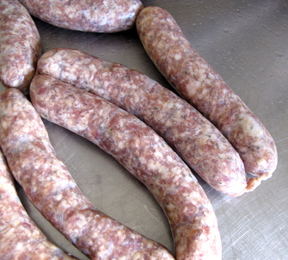 |
| Breakfast |
The sausages
should, of course, get popped back into the fridge right away and eaten within
a few days or packaged and frozen as soon as possible.
No comments:
Post a Comment